Panning for iPhone Panorama Shots
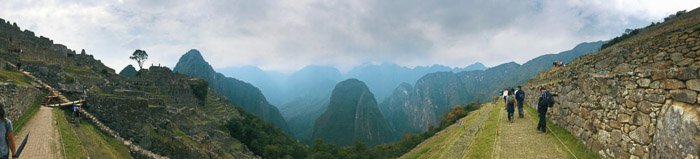
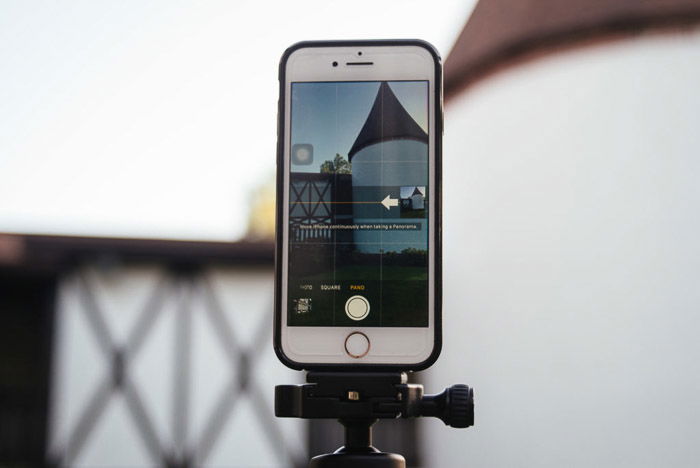
In simplest terms, a panorama is a wide-angle shot of any particular scene. Unlike any regular wide-angle images, it’s longer than a typical photo and covers more space. There are two main ways of shooting panoramas. The first option is to use a specialized camera that takes panoramic pictures in a single take. The second option is to use a regular camera and take photos of a place section by section while panning. If you haven’t heard of the term panning before, here’s a useful article. Panning is the act of moving the camera from left to right (or vice versa) from a fixed position. This technique is what you’ll use to take iPhone panoramic photos. So how do you take a panorama with your Apple iPhone? First, open your iPhone’s camera and choose Pano at the bottom of the screen. In Pano Mode, you’ll see an arrow at the left of the screen and a thin line across it. Once you press the camera button, pan your phone while keeping the arrow at the center of the line. Move at a slow pace. The camera will automatically take pictures and stitch them together for you.
How to Keep Your iPhone Steady
iPhone panoramas are a bunch of images connected to create one long photo. If you move too much while panning, you’ll end up with a crooked or distorted photograph. To avoid any distortions in your pano shot, keep your hand as close to your chest as possible. That way you minimize your movement and have a better chance of maintaining the arrow at the center. Even so, don’t keep it too close to you that you can’t see the screen anymore. It’s crucial that you keep your eyes on the arrow. It’s your only guide to ensure that your photo is going to be straight. If you can’t keep your camera stable by holding it, then consider using a tripod. If you have a selfie stick, unscrew the holder and mount it onto the tripod. Then attach your device and start shooting like you would if you were holding it. Loosen the pan locking knob so you can move your panoramic iPhone from left to right. At the same time, tighten the tilt locking knob. This way your phone won’t accidentally go up or down and distort your image.
Why You Should Practice iPhone Panoramas at Home
Shooting iPhone panoramas is easy. But it would help if you practice panning first at home before you take it outside. So when the time comes, you don’t have to waste your time fumbling with your phone and keep missing shots. The name of the game is keeping that arrow at the center. First, take a photo while holding your phone. Then try doing it while your device is on the tripod. Once you get used to the movement and keep everything in line, then you’re ready to go. In most situations, I’d recommend you to attach your phone to a tripod to get the smoothest shots. But unfortunately, you can’t use it all the time. For instance, there are a lot of tourist spots that don’t allow tripods. There are also times when you find yourself in a tight place, and you don’t have space for extra equipment. That’s when knowing how to shoot panorama handheld becomes useful. So don’t ever forget to learn it.
How to Compose iPhone Panoramas
Another skill that you need to practice is composing your iPhone panoramic shots. Panoramic pictures are longer than what your screen can display. So you’ll need to know how much of the scene you’d like to capture. To start, observe your surroundings and look for a specific area that you’d like to shoot. Once you find a good location, choose landmarks where you want to start and end your panorama. Before you take a photo, pan your phone and see if you can get the scene you want in one single sweep. It will also help if you take some test shots. Doing so allows you to tweak your composition and ensure the elements you want to include are in the frame. To limit the length of your panorama, tap the iPhone camera button. Your phone will automatically stop taking the pano shot. You can also swivel your device to the left once you’re finished, and it will cut the frame for you.
How to Break Composition Rules for More Creative Photos
Remember all the steps required to achieve the perfect panorama on your iPhone? What if you don’t follow them? What do you think would you get? Go ahead and try to break the rules and see what results you get. Start with moving your phone up and down while panning. You’ll most likely end up warping the objects in your image when you do this. But, if you want to achieve psychedelic effects, then this would be a great technique to try. Next, try capturing moving objects in your panoramas instead of avoiding them. Don’t think about how it might appear in your picture. Press the shutter and surprise yourself. Having distorted and elongated objects could make your photo look unique and interesting. You can also try cloning people into your pictures. Ask a friend to stand where you want to start the image. As you pan your phone from left to right, ask them to run behind you and move to where you want to end your panorama. Once you’re finished shooting, your friend will appear in both ends of your pano shot.
Why You Should Avoid Moving Objects
Remember how your phone takes several photos and stitches them together? If there’s any movement while it’s capturing the scene, the object will end up looking elongated and distorted. This means that you should avoid crowded places with people and vehicles. The inability to record movement is definitely a drawback to iPhone panoramas. But that doesn’t mean you can’t get around the issue. A straightforward solution is to go out when it’s not as busy outside. The best times to shoot are during sunrise and sunset. Since most people are still in bed, you don’t have to worry about pedestrians ruining your panoramas. Apart from that, you also get to enjoy the majestic light from the golden hour. Another trick is to change your perspective. You can tilt your phone up, down, or even sideways to avoid busy areas.
Best Photography Apps for iPhone Panoramas
You don’t have to rely on your iPhone’s camera app to create a panorama image. There are plenty of third-party apps out there that are as good if not better. So feel free to experiment with those if you want to take your photos to the next level. The first third-party app you should try is Microsoft Pix. It offers plenty of features including PhotoSynth which creates panoramas. What makes it different from the iPhone’s native app is that it allows you to go up and down as well as left and right. As a result, you’ll have a bigger frame to work with when capturing sceneries. Not to mention the fact that you don’t have to worry about aligning the arrow, anymore. Another great app is 360 Panorama. As the name suggests, it lets you shoot your surroundings in 360 degrees. In contrast, pano iPhone only allows you 180 degrees or even less. What’s cool about the 360 Panorama is that it lets you view images using virtual reality goggles. You can even share it on Facebook so that your friends can enjoy the immersive views as well.
Why Sync Your 360 Camera to Your Phone
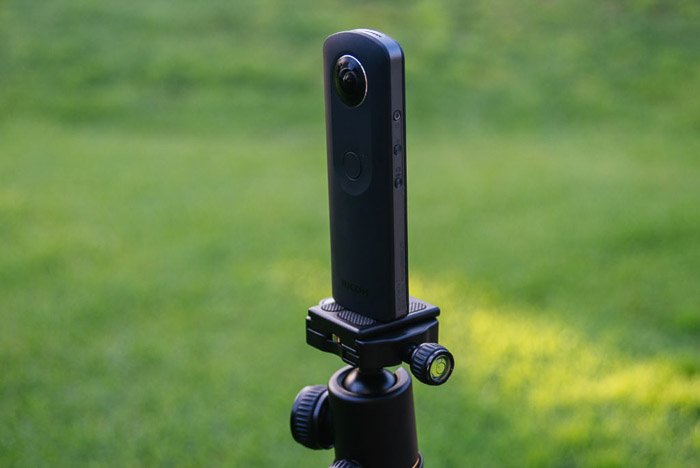
360 cameras have been gaining popularity in the past few years. Some people like using them since they can shoot immersive 360 images in one shot. Some of the popular ones include the Ricoh Theta and the Insta360 among others. Unlike regular panoramas, 360 photos are spherical. That means, it allows people to observe a scene from the sideways, from below, and even above. It allows you to experience a scenery as if you’re actually there. Most 360 camera users think that they can only view the images through virtual reality goggles or on their phone or computer. But many of them don’t know that they can convert their images into panoramas as well. So if you have a 360 camera, then you should try converting your 360 images into pano shots yourself. The apps for these devices often have a panorama view function. You can use it to change the format of your pictures. Select the file, save it, and you have yourself a panorama.
Conclusion
The panorama mode is useful for travel and landscape photography. Now that you have the necessary skills don’t hesitate to take a pano shot whenever you see a beautiful scene. It’s such a great way of capturing the essence of different places that ordinary pictures can’t. Go out there and take advantage of it.


title: “How To Shoot Stunning Iphone Panorama Photos” ShowToc: true date: “2023-02-08” author: “Darren Becker”
Panning for iPhone Panorama Shots
In simplest terms, a panorama is a wide-angle shot of any particular scene. Unlike any regular wide-angle images, it’s longer than a typical photo and covers more space. There are two main ways of shooting panoramas. The first option is to use a specialized camera that takes panoramic pictures in a single take. The second option is to use a regular camera and take photos of a place section by section while panning. If you haven’t heard of the term panning before, here’s a useful article. Panning is the act of moving the camera from left to right (or vice versa) from a fixed position. This technique is what you’ll use to take iPhone panoramic photos. So how do you take a panorama with your Apple iPhone? First, open your iPhone’s camera and choose Pano at the bottom of the screen. In Pano Mode, you’ll see an arrow at the left of the screen and a thin line across it. Once you press the camera button, pan your phone while keeping the arrow at the center of the line. Move at a slow pace. The camera will automatically take pictures and stitch them together for you.
How to Keep Your iPhone Steady
iPhone panoramas are a bunch of images connected to create one long photo. If you move too much while panning, you’ll end up with a crooked or distorted photograph. To avoid any distortions in your pano shot, keep your hand as close to your chest as possible. That way you minimize your movement and have a better chance of maintaining the arrow at the center. Even so, don’t keep it too close to you that you can’t see the screen anymore. It’s crucial that you keep your eyes on the arrow. It’s your only guide to ensure that your photo is going to be straight. If you can’t keep your camera stable by holding it, then consider using a tripod. If you have a selfie stick, unscrew the holder and mount it onto the tripod. Then attach your device and start shooting like you would if you were holding it. Loosen the pan locking knob so you can move your panoramic iPhone from left to right. At the same time, tighten the tilt locking knob. This way your phone won’t accidentally go up or down and distort your image.
Why You Should Practice iPhone Panoramas at Home
Shooting iPhone panoramas is easy. But it would help if you practice panning first at home before you take it outside. So when the time comes, you don’t have to waste your time fumbling with your phone and keep missing shots. The name of the game is keeping that arrow at the center. First, take a photo while holding your phone. Then try doing it while your device is on the tripod. Once you get used to the movement and keep everything in line, then you’re ready to go. In most situations, I’d recommend you to attach your phone to a tripod to get the smoothest shots. But unfortunately, you can’t use it all the time. For instance, there are a lot of tourist spots that don’t allow tripods. There are also times when you find yourself in a tight place, and you don’t have space for extra equipment. That’s when knowing how to shoot panorama handheld becomes useful. So don’t ever forget to learn it.
How to Compose iPhone Panoramas
Another skill that you need to practice is composing your iPhone panoramic shots. Panoramic pictures are longer than what your screen can display. So you’ll need to know how much of the scene you’d like to capture. To start, observe your surroundings and look for a specific area that you’d like to shoot. Once you find a good location, choose landmarks where you want to start and end your panorama. Before you take a photo, pan your phone and see if you can get the scene you want in one single sweep. It will also help if you take some test shots. Doing so allows you to tweak your composition and ensure the elements you want to include are in the frame. To limit the length of your panorama, tap the iPhone camera button. Your phone will automatically stop taking the pano shot. You can also swivel your device to the left once you’re finished, and it will cut the frame for you.
How to Break Composition Rules for More Creative Photos
Remember all the steps required to achieve the perfect panorama on your iPhone? What if you don’t follow them? What do you think would you get? Go ahead and try to break the rules and see what results you get. Start with moving your phone up and down while panning. You’ll most likely end up warping the objects in your image when you do this. But, if you want to achieve psychedelic effects, then this would be a great technique to try. Next, try capturing moving objects in your panoramas instead of avoiding them. Don’t think about how it might appear in your picture. Press the shutter and surprise yourself. Having distorted and elongated objects could make your photo look unique and interesting. You can also try cloning people into your pictures. Ask a friend to stand where you want to start the image. As you pan your phone from left to right, ask them to run behind you and move to where you want to end your panorama. Once you’re finished shooting, your friend will appear in both ends of your pano shot.
Why You Should Avoid Moving Objects
Remember how your phone takes several photos and stitches them together? If there’s any movement while it’s capturing the scene, the object will end up looking elongated and distorted. This means that you should avoid crowded places with people and vehicles. The inability to record movement is definitely a drawback to iPhone panoramas. But that doesn’t mean you can’t get around the issue. A straightforward solution is to go out when it’s not as busy outside. The best times to shoot are during sunrise and sunset. Since most people are still in bed, you don’t have to worry about pedestrians ruining your panoramas. Apart from that, you also get to enjoy the majestic light from the golden hour. Another trick is to change your perspective. You can tilt your phone up, down, or even sideways to avoid busy areas.
Best Photography Apps for iPhone Panoramas
You don’t have to rely on your iPhone’s camera app to create a panorama image. There are plenty of third-party apps out there that are as good if not better. So feel free to experiment with those if you want to take your photos to the next level. The first third-party app you should try is Microsoft Pix. It offers plenty of features including PhotoSynth which creates panoramas. What makes it different from the iPhone’s native app is that it allows you to go up and down as well as left and right. As a result, you’ll have a bigger frame to work with when capturing sceneries. Not to mention the fact that you don’t have to worry about aligning the arrow, anymore. Another great app is 360 Panorama. As the name suggests, it lets you shoot your surroundings in 360 degrees. In contrast, pano iPhone only allows you 180 degrees or even less. What’s cool about the 360 Panorama is that it lets you view images using virtual reality goggles. You can even share it on Facebook so that your friends can enjoy the immersive views as well.
Why Sync Your 360 Camera to Your Phone
360 cameras have been gaining popularity in the past few years. Some people like using them since they can shoot immersive 360 images in one shot. Some of the popular ones include the Ricoh Theta and the Insta360 among others. Unlike regular panoramas, 360 photos are spherical. That means, it allows people to observe a scene from the sideways, from below, and even above. It allows you to experience a scenery as if you’re actually there. Most 360 camera users think that they can only view the images through virtual reality goggles or on their phone or computer. But many of them don’t know that they can convert their images into panoramas as well. So if you have a 360 camera, then you should try converting your 360 images into pano shots yourself. The apps for these devices often have a panorama view function. You can use it to change the format of your pictures. Select the file, save it, and you have yourself a panorama.
Conclusion
The panorama mode is useful for travel and landscape photography. Now that you have the necessary skills don’t hesitate to take a pano shot whenever you see a beautiful scene. It’s such a great way of capturing the essence of different places that ordinary pictures can’t. Go out there and take advantage of it.
