Resize Photos for FaceBook to Avoid How FaceBook Ruins Your Images
Facebook is still hugely popular social media platform. An estimated 350 million images are uploaded to Facebook every day! That is a ton of data for Facebook to load. To cope with it, it compresses images to reduce the file size, and the bandwith used. This results in what is called compression artifacts. In photography, an artifact in a noticeable distortion in digital media. There are different types of artifacts that cause unwanted changes in a digital file and reduce the quality of the file. Compression artifacts occur specifically when a photo is compressed. Some data is lost, so we refer to this as “lossy compression”. This results in less than perfect-looking photos. Not exactly what you want as a photographer advertising your skills and services.
Resize Images for Facebook
Keeping up with the ever-changing image size and formats is no small task. Here are my recommendations for the various types of images you might be concerned with on Facebook.
Your Profile
Your profile is an important visual representation of you and your brand. It appears on your timeline. And it appears in the search, with comments you make, each post you share, and on people’s timeline where you post messages. The recommended sizing for a Facebook profile image is 761 x 761. I recommend resizing your profile image at 2048 pixels for the highest quality. For one thing, viewers can click on your profile image and see a much larger rendition. 2048 pixels on the long edge is the maximum size Facebook will store. Take advantage of it and upload a high quality image. Notice that even though you upload a square or rectangular picture, that Facebook it will crop it into a circle. Make sure no important features or logos are cut off.
Your Facebook Cover Images
Your cover photo is the perfect place to show the essence of your brand. Avoid text and calls-to-action, as certain user interface elements will cover some parts of your image. The default sizing for a Facebook cover on a desktop is 820 x 312 pixels. The default for smartphones is 640 x 360. If you use a design program like Canva to design your Facebook cover, it will default to 820 x 312 pixels as well. But I have found that currently the maximum size for cover images is 1958 x 745. This means if you are resizing your images in Lightroom, your images would need to be resized to 1118 x 745 pixels.
Facebook Image Upload Sizes
Although there is a lot of complaint about the quality of images on Facebook, the image compression actually used to be much worse. Facebook has made image quality a priority when resizing and optimizing for their platform. Thus, the frequently changing image parameters. When you upload an image to a Facebook post, the maximum width it will display is 492 pixels. The height will depend on the orientation of the image. Note that if you’re uploading images with different sizes and orientations, Facebook is going base the layout on the first photo. If your first photo is a portrait, the portrait layouts will be applied based on how many photos have been uploaded. When you click on the image to expand it in Theatre view, it will automatically scale up to fit your screen size. Once again, Facebook seems to generally have an upper limit of 2048 pixels on the long edge. This is regardless of the image orientation. If one side of your image is higher than 2048, then Facebook will resize the image. It will try to get a value as close to 2048 as possible while keeping the same aspect ratio.
How to Resize in Lightroom
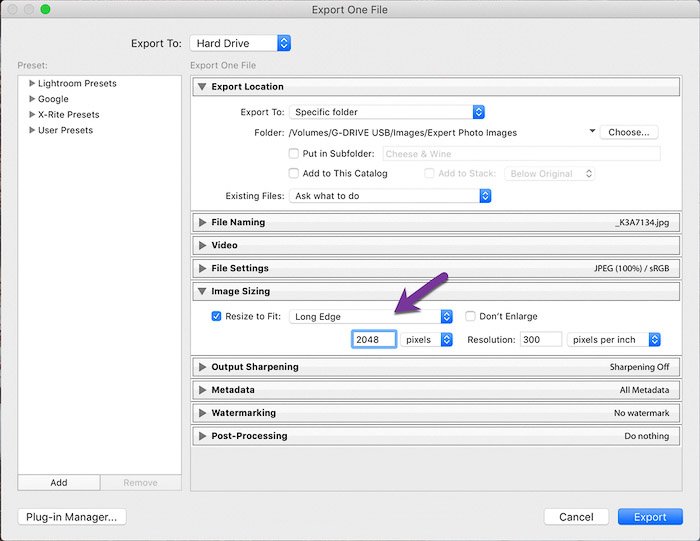
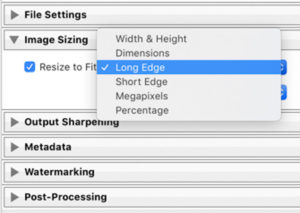
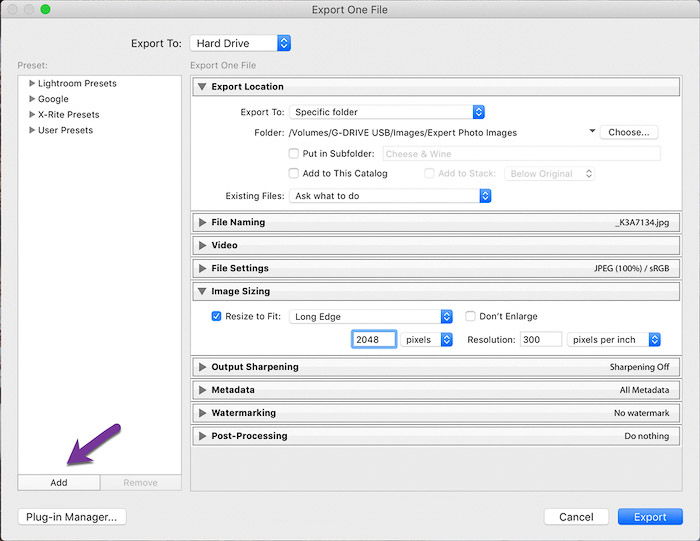
There are various ways to prepare your images for Facebook. Using Lightroom is one of the simplest. You used to be able to use Lightroom’s “Publish Services” in the Library module to publish images to your Facebook timeline. But, as of August 2018, this option is no longer available for Lightroom Classic CC desktop applications. What you can still do, is resize your images upon export: Go to File Choose Export Under Image Sizing check Resize to Fit then click on the dropdown menu. Choose Long Edge Type in 2048 into the box below and select pixels from the corresponding dropdown menu. You can create a preset of this size by clicking on the Add button in the bottom left-hand corner of the Export box.
Conclusion
There are recommended sizes for images found throughout Facebook. But our advice is to upload the largest resolution you can get away with. Facebook will store a higher resolution photo if you upload it. A sharp, high quality Facebook cover is a great promotional tool to build your personal or professional brand. Next, check out our post on how to crop and straighten photos in Lightroom! Or, if you’re feeling creative try adding a film photography look to your photos!
